Search in documentation
Advanced emails
Plugin installation
Installation is the same as for our other plugins. The plugin is installed using the ThisPlugin Manager. More information on where to get this free plugin and how to install it can be found at this link.
To install the plugin, you must first purchase a paid plugin license. You can buy it from the plugin presentation page on Gumroad. Then you add a license in ThisPlugin Manager and the plugin will be automatically installed in the latest version. After that, all you need to do is activate and set it up.
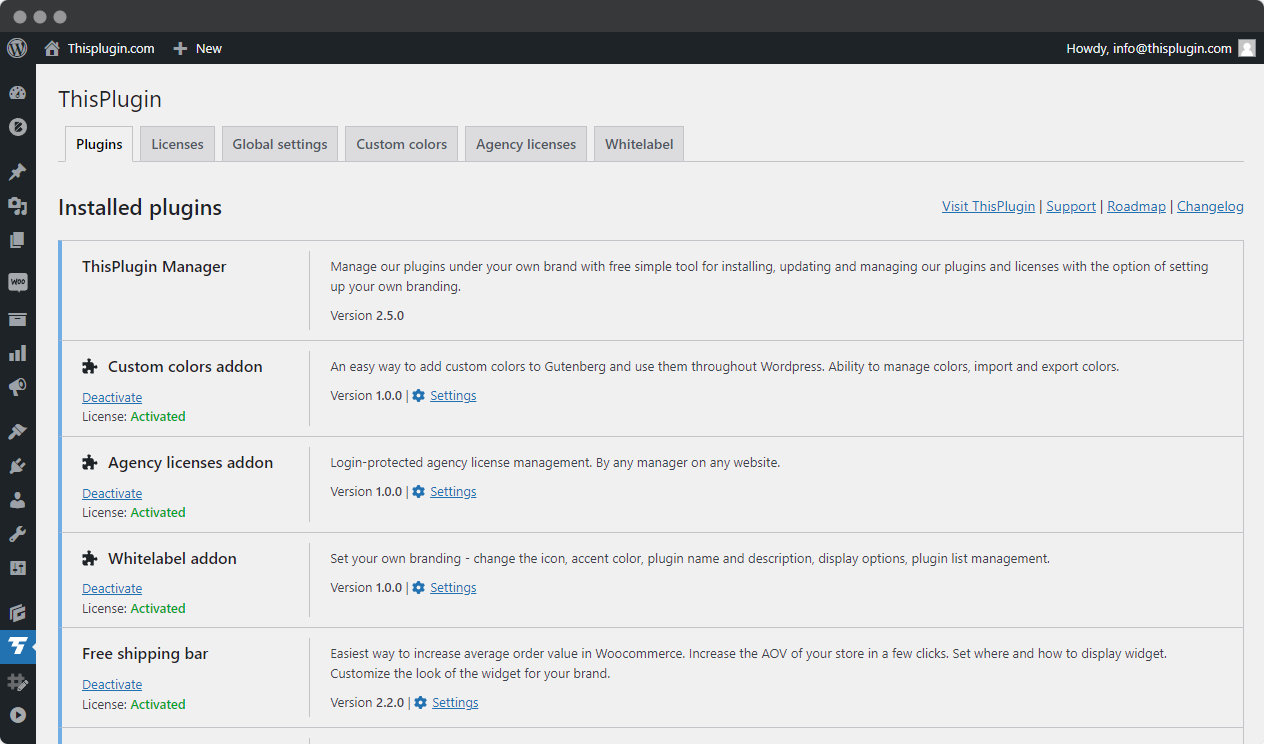
You can install addons in exactly the same way. All the addons that we offer for this plugin can be found on the Advanced e-mails presentation page.
Plugin overview
The Advanced emails plugin is clearly one of the most advanced plugins in Woocommerce for managing transactional emails. It replaces the features of at least 5 other plugins.
It will help you manage all your transactional emails in one place. It will allow you to create new transactional emails and set advanced variables and triggers for sending them. It will help you to standardize the branding of your emails – it will allow you to completely change the appearance of sent emails and, of course, their content. It will also allow you to add email attachments, change CC and BCC of recipients. Adds an email for canceled orders sent to customers as well as the ability to create reminders.
The functionality of the plugin can be extended using addons.
E-mails
The Emails tab contains a list of all the emails available in Woocommerce and any custom emails you have added.
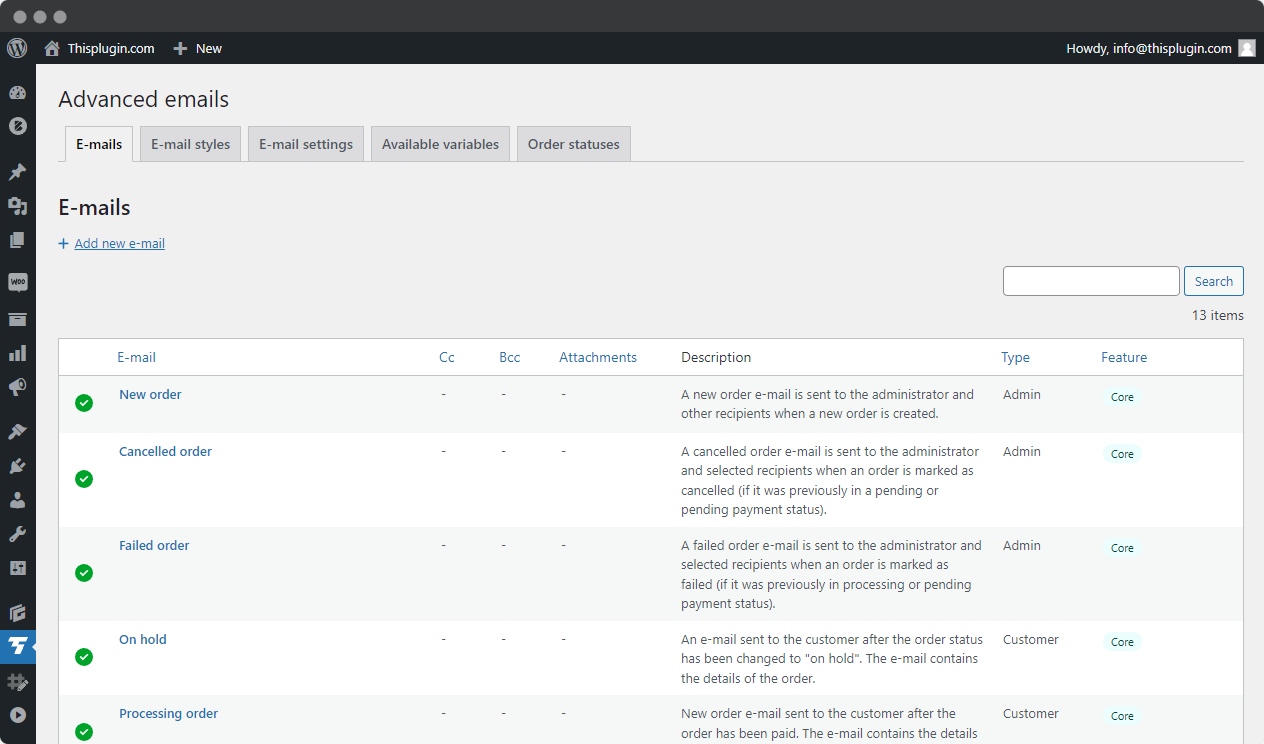
Emails are displayed in a table with all important information.
You will find in it:
- E-mail Name
- CC Recipients
- BCC Recipients
- Email Attachments
- Description
- Type – by primary recipient
- Tag – depending on whether it is a built-in feature of Woocommerce (core), an added email (advanced) or your own email (custom tag).
E-mail management
The email table can be searched, filtered (soon) and sorted. You can also add your own tags to organize your emails.
When you move the cursor over a row in the table, the actions for each email are displayed.
E-mail actions
Each email in the table can be edited, tested, previewed or deleted.
E-mail testing
The plugin allows you to send a test email to the address entered in the modal window. You will see what the email looks like in your mailbox.
E-mail preview
In order to see the preview, you must have at least one, ideally more, orders with different statuses. A preview of the email will appear in a modal window after you click the Preview link.
Edit e-mail
The basic setting is to enable/disable e-mail sending. This applies mainly for native Woocommerce e–mails that cannot be deleted. This setting enables email in the Woocommerce system.
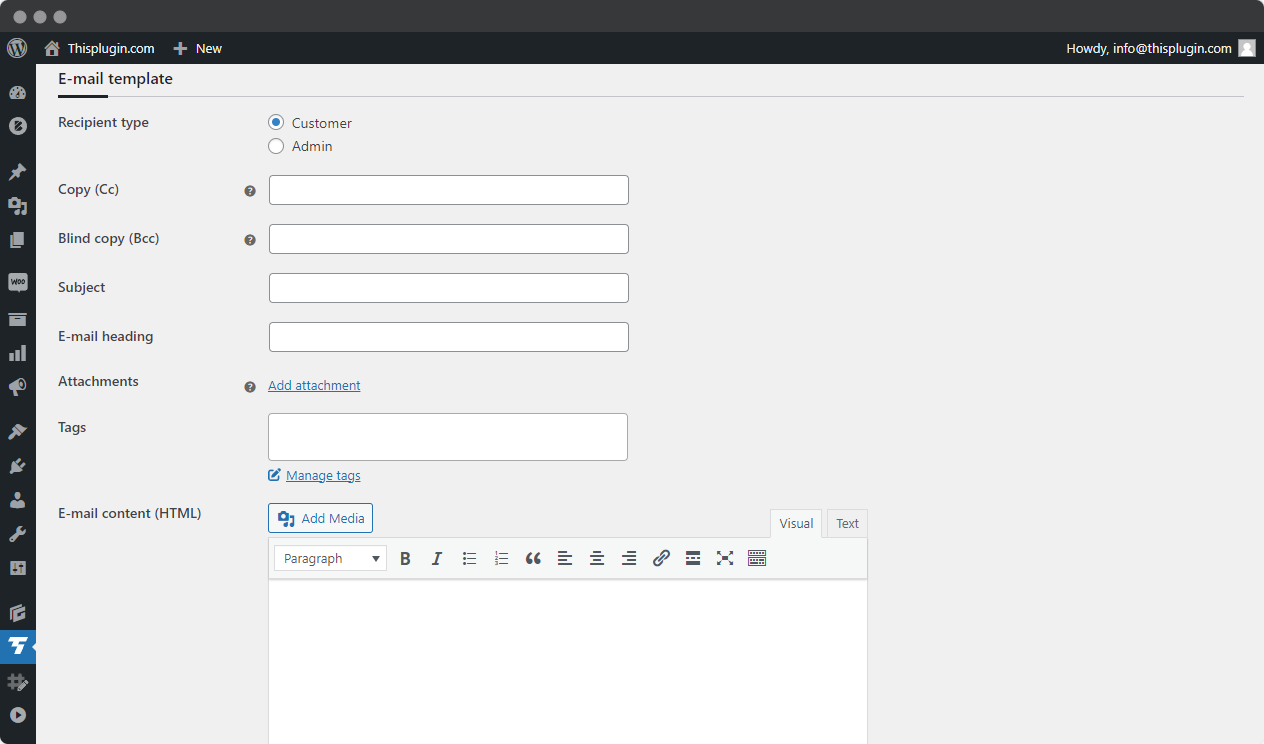
In the email template settings (for standard Woocommerce e-mails), you can make additional settings:
- Recipients – this setting applies only to emails sent to the administrator and your own emails, you can add one or more emails separated by a comma.
- Copy (Cc) – you can leave this field blank or add 1 or more emails separated by a comma.
- Blind copy (Bcc) – you can leave the field blank or add 1 or more emails separated by commas.
- E-mail subject – you can keep the default subject or set your own (you can use available variables in the subject), you can restore the original one via the link Load recommended subject.
- Email heading – similar to the subject, you can use a preset (you can use available variables in the header), create your own, and also restore the original.
- Attachments – you can add one or more attachments and change their order after adding them.
- Tags – easy labeling of e-mails for easier management.
- Content of the e-mail in HTML format – to add the text of the email, you can use formatting through the WYSIWYG editor and of course variables.
- Content of e-mail in plain text format – some services that send e-mail require that an e-mail message also be included in plain text format.
Custom transactional e-mails also contain additional fields for setting triggers and their conditions.
Available variables:
Subject and header
{site_title}
{site_address} / {site_url}
{order_date}
{order_number}
E-mail content
{site_title}
{site_address}
{site_url}
{order_date}
{order_number}
{customer_first_name}
{customer_last_name}
{customer_full_name}
{order_details} – order number and order date
{order_meta} – product table with order summary – products, subtotal, total amount, or other information about payment and delivery
{customer_details} – billing and possibly also delivery address
You can also use advanced conditions in the email body to branch the text content of the email. The method of creating conditions, options and specific examples can be found in the plugin on the Available Variables tab.
Delete e-mail
Only custom added emails can be deleted. Basic Native Woocommerce emails cannot be deleted. They can only be disabled using the Disable feature.
Adding a new e-mail
To add an email, it is necessary to gradually fill in the basic settings, triggers, trigger conditions and finally the email templates.
1. Basic settings
Basic settings include enable/disable sending of e-mails, adding an internal e-mail name and an internal description.
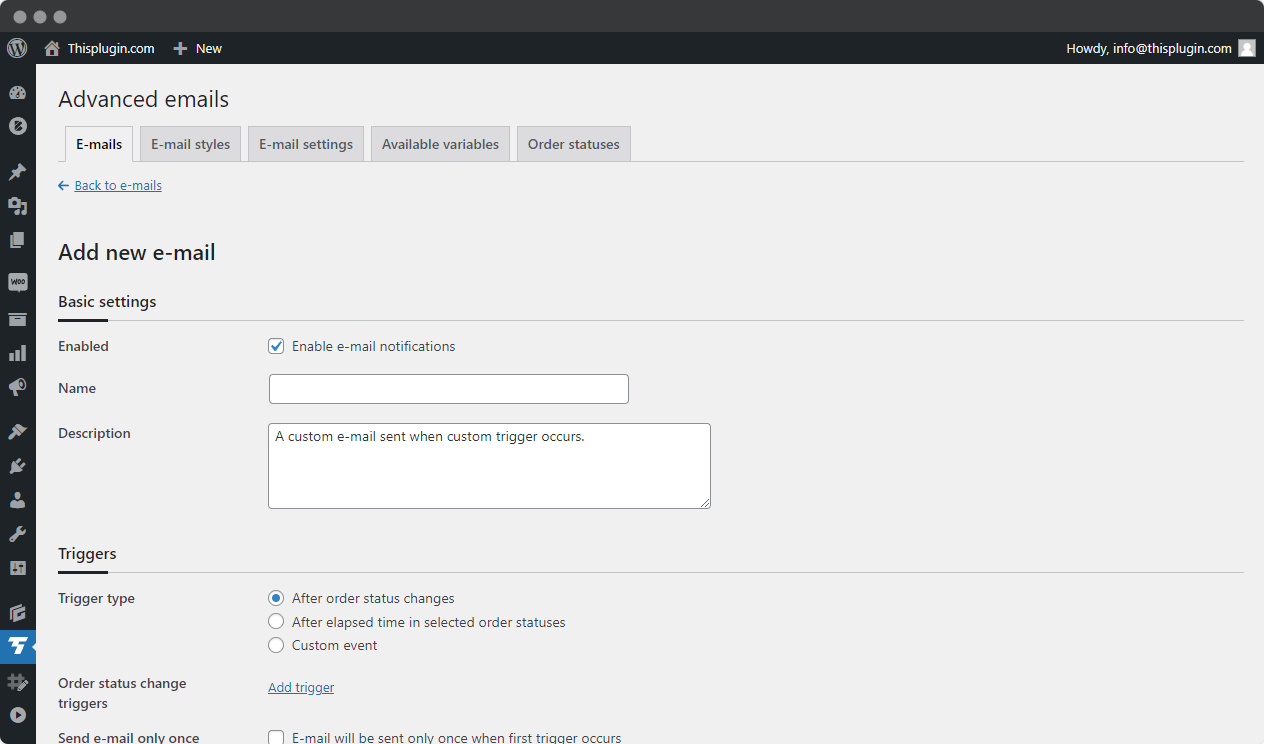
2. Triggers
First select the trigger type. This determines when the email will be sent.
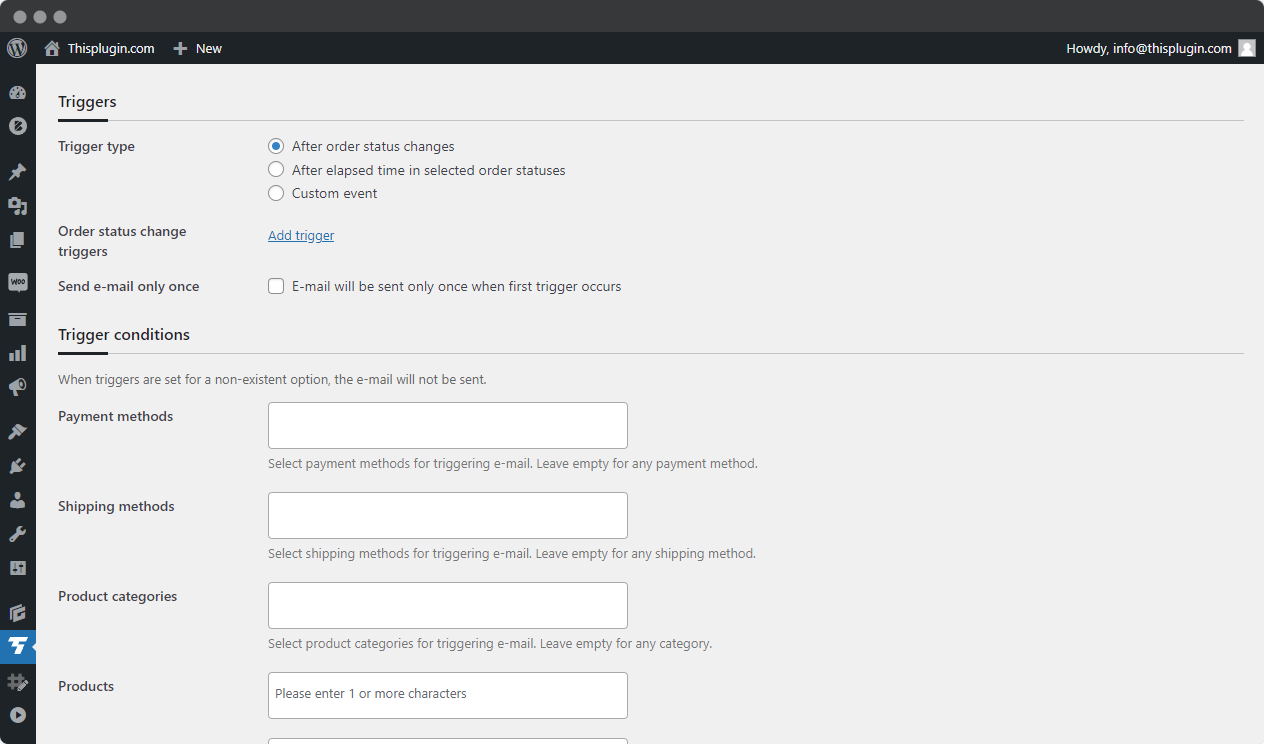
You can choose from 3 options:
- A) After order status changes
- B) After elapsed time in selected order statuses
- C) Custom event
A) After order status changes
If you select this option, add status changes that trigger an email to be sent. Select the status for Order Status From and Order Status To. You can add 1 or more status changes. At the same time, you can set the email to be sent only once and not repeatedly, i.e., when the first of the triggers occurs.
This option is especially useful if you use the Order Status add-on and create your own order statuses. Secondarily, you can use this option to send notifications to the administrator, people in the warehouse, accounting, etc. when the status of customer orders changes.
B) After elapsed time in selected order statuses
If you choose this option, first select the order status(es) from which the elapsed time is to be calculated. Then select whether you want the email to be sent immediately, after the selected time has elapsed, or at a specific hour after the selected time has elapsed (the set times are approximate). Again, you can choose to send the email only once, when the first trigger occurs.
This option is perfect if you want to create follow up emails. For example for sending a request to add a review or sending instructions for the purchased product or other purchase-related information.
C) Custom event
The last option you can select is Custom Event. You can select from the following options:
- After the order is created
- After first order is created
- After customer registration
- After customer first login
- After customer password reset
- After customer review
Depending on which custom event you choose, you can further customize the trigger conditions. These are other conditions that must be met in order to send an email.
Custom events are very useful when you want to personalize content for customers.
For example, you can welcome customers who have purchased from you for the first time and send them a discount for their next purchase. Or you can thank them for their reviews. With advanced content creation options, you can even set different text for positive and negative reviews.
3. Trigger conditions
Trigger conditions can be divided into 2 basic types. The first are trigger conditions that are linked to orders, the second are conditions that are linked to the customer’s account or the addition of a review.
A) Conditions linked to orders
The following options are available now:
- Payment methods
- Shipping methods
- Product categories
- Products
- User roles
- Custom conditions
One or more items can be selected for each option. In custom conditions, it is possible to add additional conditions in text notation according to our rules.
When triggers are set for a non-existent option, the e-mail will not be sent.
B) Conditions linked to user account or reviews
For these conditions, it is possible to select user roles while setting your own custom conditions.
If triggers are set for a non-existent option, the email will not be sent.
4. E-mail template
This is done in the same way as described in the Editing e-mail section. In addition, you can set the type of email recipient. If you select an administrator, you can also set his or her e-mails.

Advanced e-mail content options
E-mail styles
This tab contains the design settings of the email template. You can visually adjust all settings using color pickers and other fields. All settings are automatically added from the Global Styles set in ThisPlugin. You can further customize them here
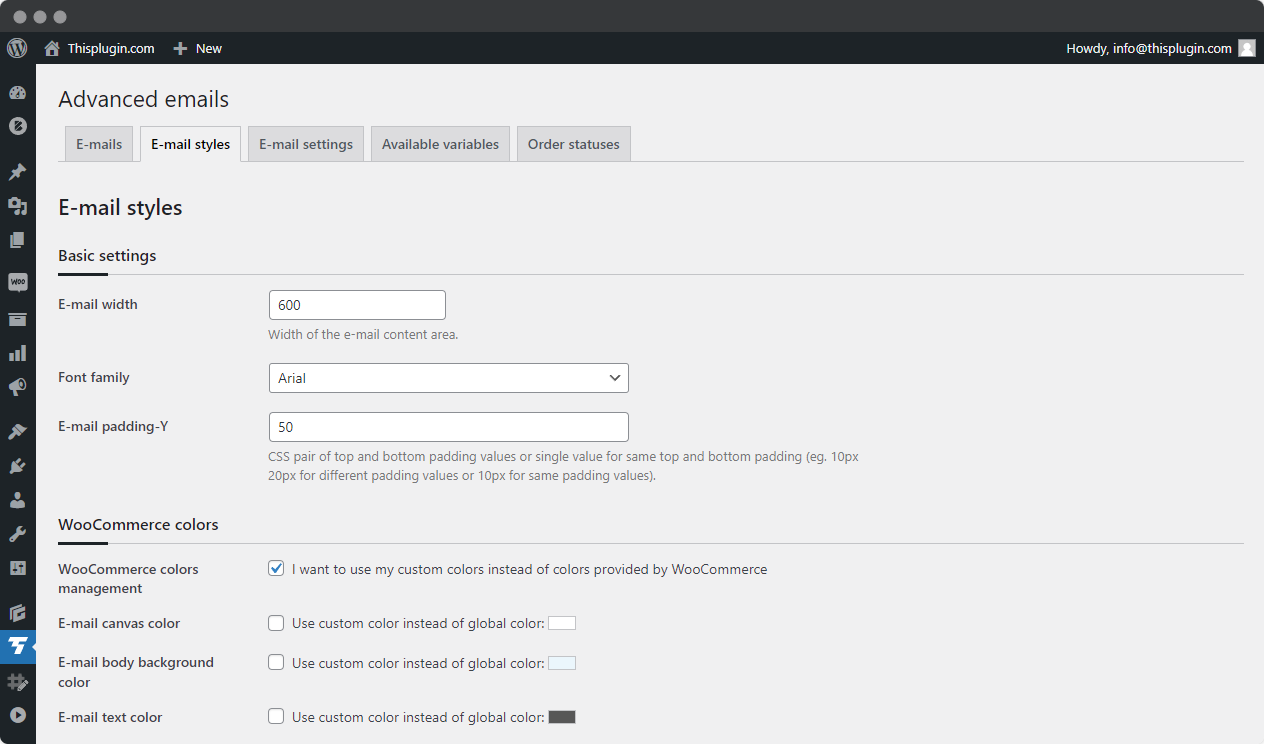
If you make a change you are not happy with, you can always restore the default CSS that comes with the plugin. Just click on the Load Default link. After clicking the link, the styles set in Global Styles in ThisPlugin Manager will be reloaded.
Which parts you can set custom styles for:
- Basic settings
- Woocommerce colors
- Header
- Email points
- Blackboard
- Address
- Footer
For most fields, we recommend that you follow the help provided with the field.
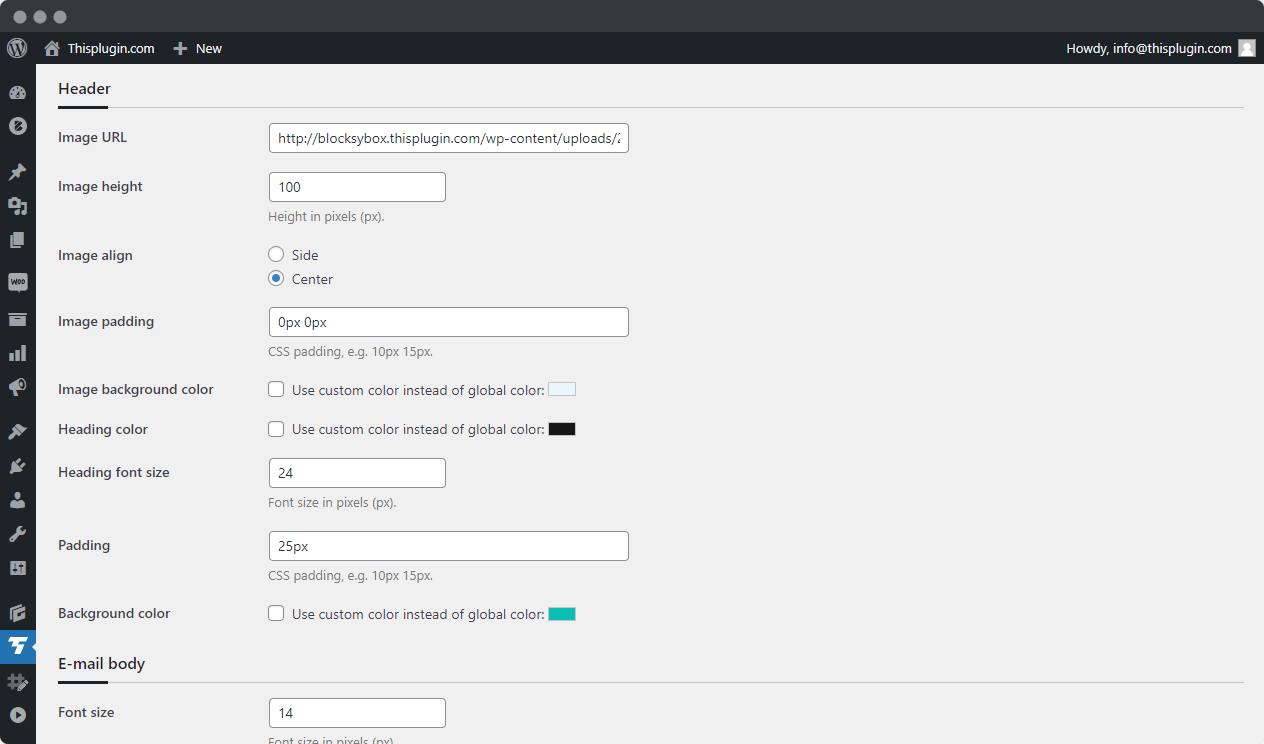
Important notes
In the basic settings, you can change the width of the e-mail (we recommend a maximum of 600 px), the font family and the e-mail Y padding.
In Woocommerce colors, you can decide if you want to “pull” the Woocommerce colors from the Woocommerce settings or if you want to use the color settings from this section.
For the header, we offer you to set the header image. It doesn’t have to be just a logo, but also a “larger” image for the entire width of the email template with your logo. You can also set the height, alignment, padding and background color for the image.
You can set odd and even backgrounds in the table. We’ve also added an option to display an image for products, including the height of the image.
In the footer, you can add links to social networks for Facebook, Twitter, Instagram, Linkedin, Pinterest and Other link. At the same time, you can set the mode for displaying the correct color of the icon – light / dark.
E-mail Settings
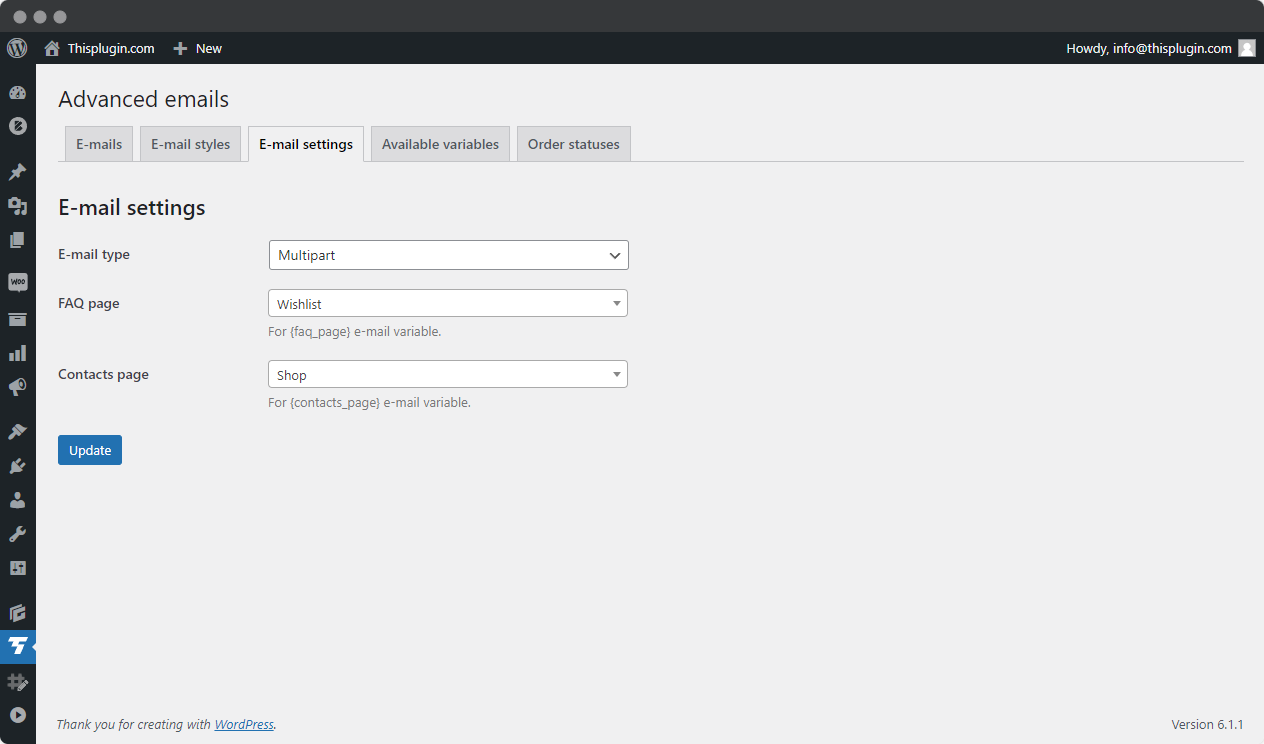
You can set the type of email in the email settings. By default, we set multipart (i.e. combined html and plain text), which is required by some services for sending transactional e-mails. However, you can also choose separate variants.
You can also set default links for the FAQ and Contact page. You can then use variables in the body of the e-mail.
Available variables
This tab contains a list of advanced conditions that you can use in the body of the email to branch the text of the email.
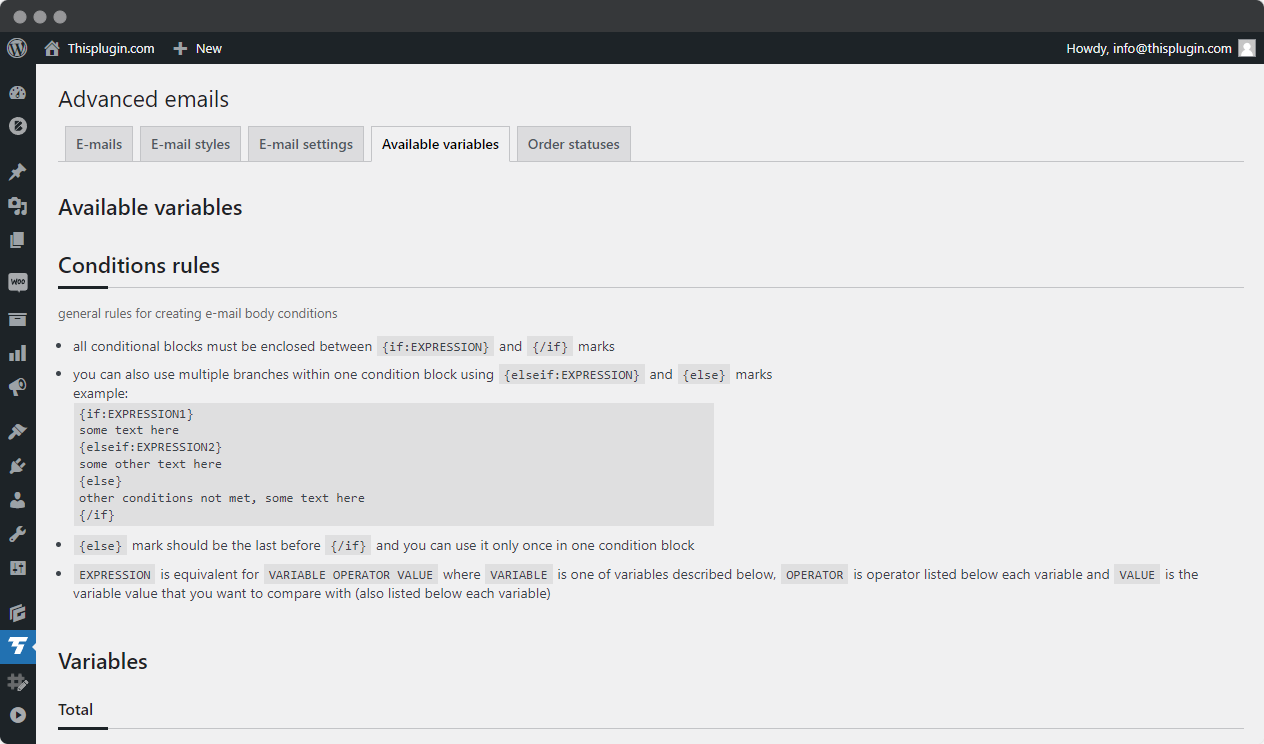
You will find here general rules for creating conditions in the body of the e-mail, but also in the custom conditions field. Of course, demos and examples are included for easy use.
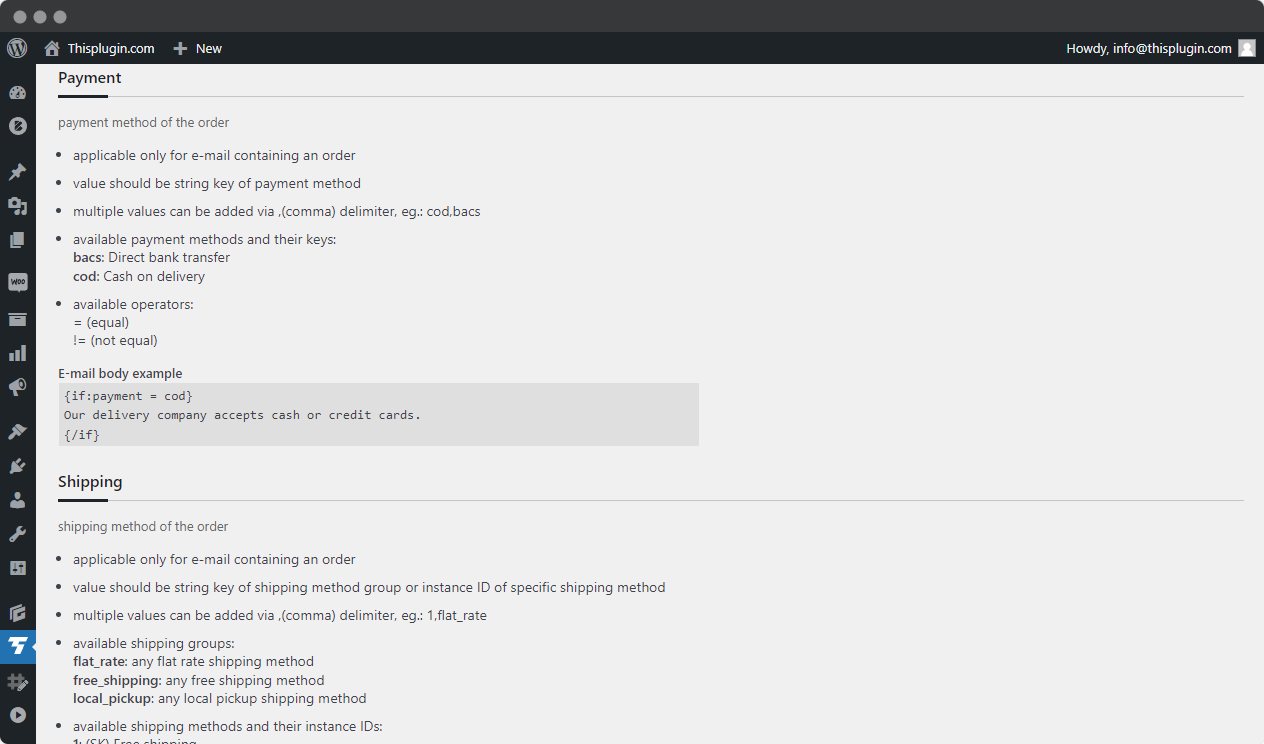
Also included are descriptions of each variable – total, weight, payment, shipping, product category, product, role, and rating. We plan to expand the list of variables in the future. This section also includes examples of how to create and use the structure.
Order statuses (addon)
You can install the addon in the same way as the main plugin or any other of our plugins. All addons we offer for this plugin can be found on the Advanced e-mail plugin presentation page.
The Order Status addon allows you to extend the functionality of the Advanced Emails plugin. This functionality could not be directly integrated into the plugin because it might cause incompatibility with other plugins with the same functionality.
Therefore, we recommend that you install the addon only if its features are not added by another plugin you have active.
Addon Overview
The addon allows you to add new order statuses. This is important if your order process differs from the standard Woocommerce order process.
Combined with the ability to create emails, you can customize any order process to suit your needs.
List of statuses
After installing the plugin, a new tab will appear in the main menu of the plugin Advanced E-mails – Order statuses.
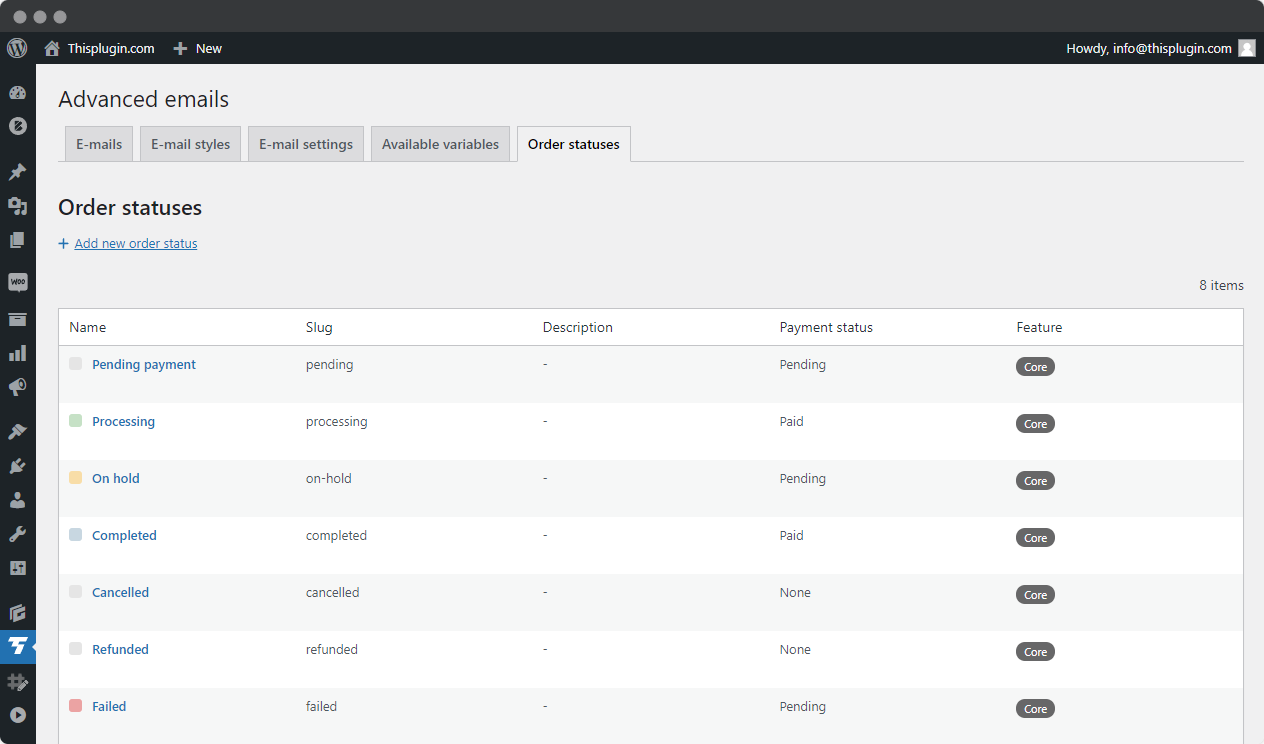
There are two main options on the tab – Add a new order status and a table of existing order statuses.
The table contains all statuses added in Woocommerce – from all plugins including Woocommerce. The advantage is that you can also edit existing statuses, e.g. change their color or add an internal status description.
In the table you can find information about the status name, its slug, description, payment status and tag. Payment status is information about the payment status of the order, i.e. whether the order in this state is already paid, requires payment, or on the contrary, does not require payment.
Add and edit actions
Adding a new status is very quick. Just add the name, slug (usually the same as the name, but without diacritics and without spaces), internal description, color and payment status.
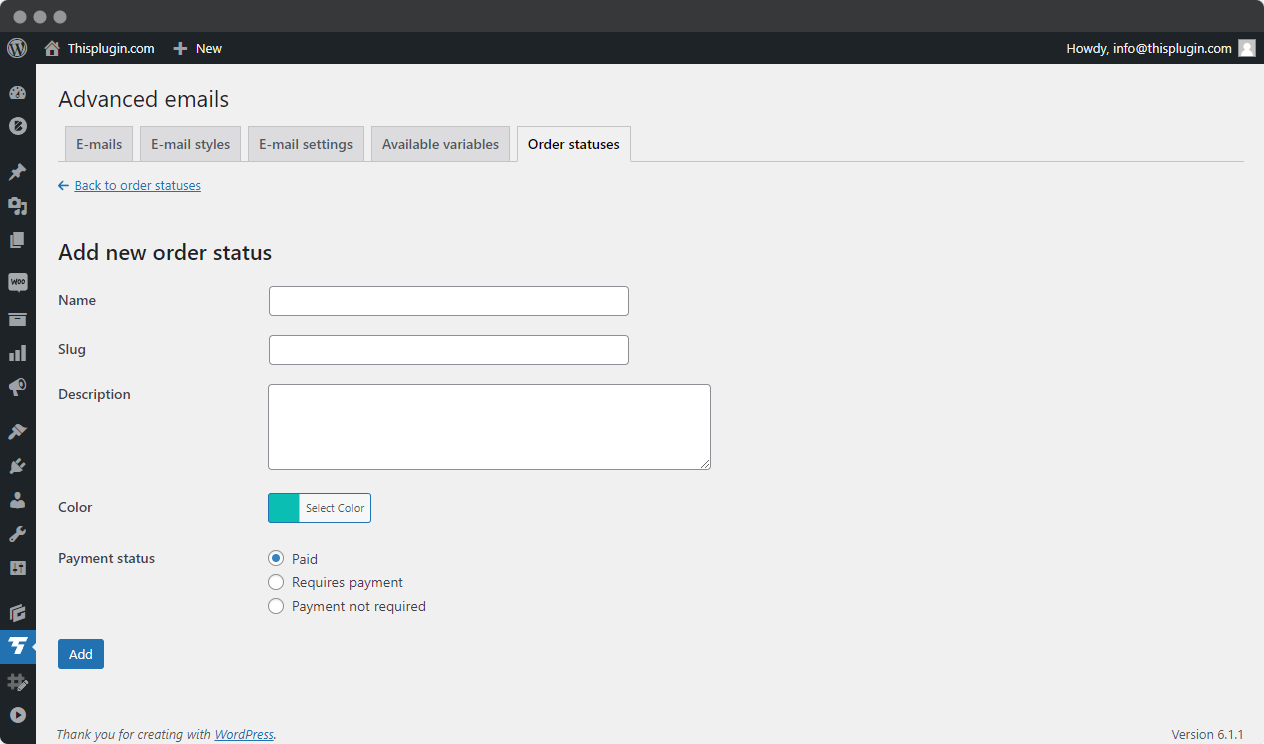
When editing, all of these fields can only be changed for custom statuses. Default statuses do not allow changing the name, slug and payment status.
Need help?
Submit a ticket
Need help setting up the plugin? Submit a ticket in our support center and we will help you.
Feature request
Didn't find the feature you were looking for? Send us a request and we will consider adding it.
Changelog
The changelog lists all the new features, enhancements and fixes already released.
Roadmap
In the roadmap you will find a list of all planned or user-proposed features.