Search in documentation
WPShipmall Sync
Plugin installation
Installation is the same as for our other plugins. The plugin is installed using the ThisPlugin Manager. More information on where to get this free plugin and how to install it can be found at this link.
To install the plugin, you must first purchase a paid plugin license. You can buy it from the plugin presentation page on Gumroad. Then you add a license in ThisPlugin Manager and the plugin will be automatically installed in the latest version. After that, all you need to do is activate and set it up.
Plugin overview
WPShipmall Sync plugin provides two way synchronization from Woocommerce to Shipmall and back.
It allows you to automatically synchronize orders. Combine shipping methods and order status triggers and easily update order status and product stock.
This plugin must be set up before first use. The plugin settings depend on your authentication data for Shipmall, as well as your shipping settings and the use case itself.
Settings
Authorization
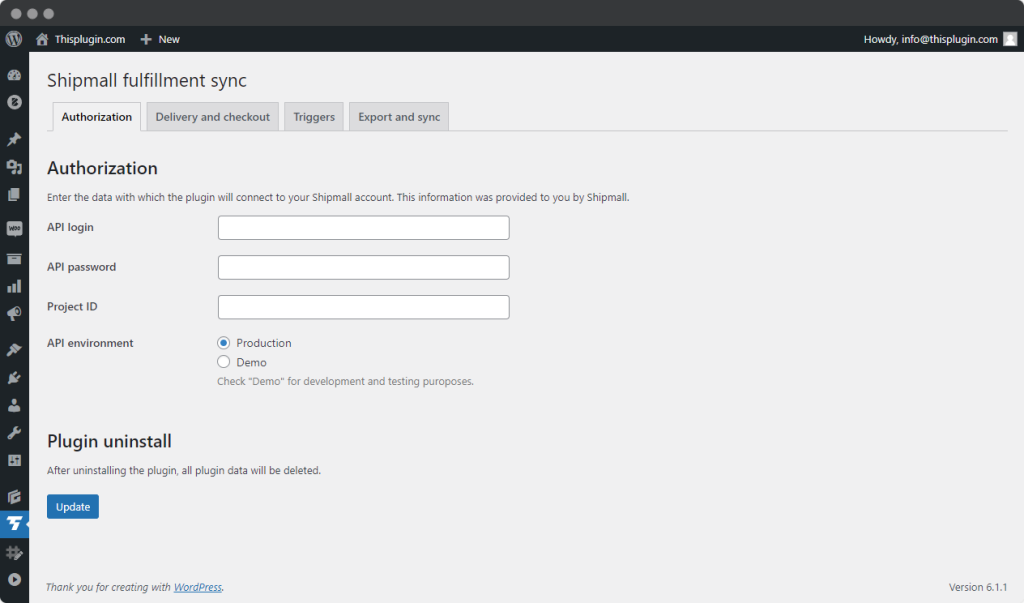
You can get all the information needed to authorize the Shipmall sync plugin with the Shipmall fulfillment solution in your Shipmall account.
You can use the DEMO mode to test the connection between the plugin and the solution. After successful testing you can switch to PRODUCTION mode by simply changing the API mode. In the API Environment section.
You will need authorization:
- login,
- password,
- and project ID.
The login and password are the same as the login and password used to log in to the Shipmall system.. You can find the Project ID in your account, in the section Client – information for developers.
Delivery
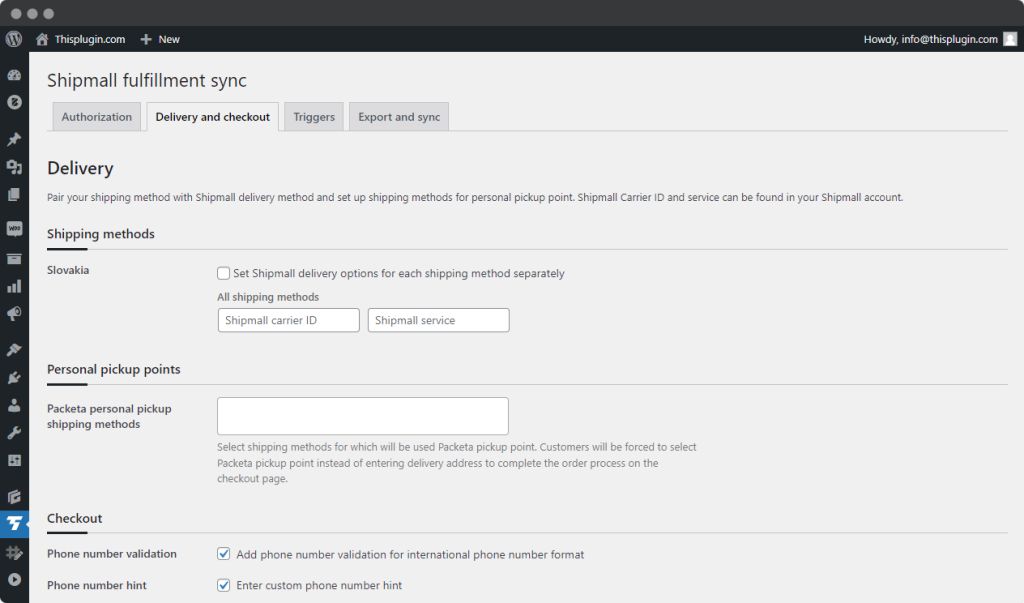
Shipping methods
In this section, you will pair Woocommerce shipping methods with carrier options in Shipmall Fulfillment. You can set the shipping methods as a whole for individual zones, or you can choose to pair at the level of individual methods within individual zones.
You will need the Shipmall Carrier ID and Shipmall Service to successfully pair the methods. You can find both values within your Shipmall account, in the section Client – Information for developers.
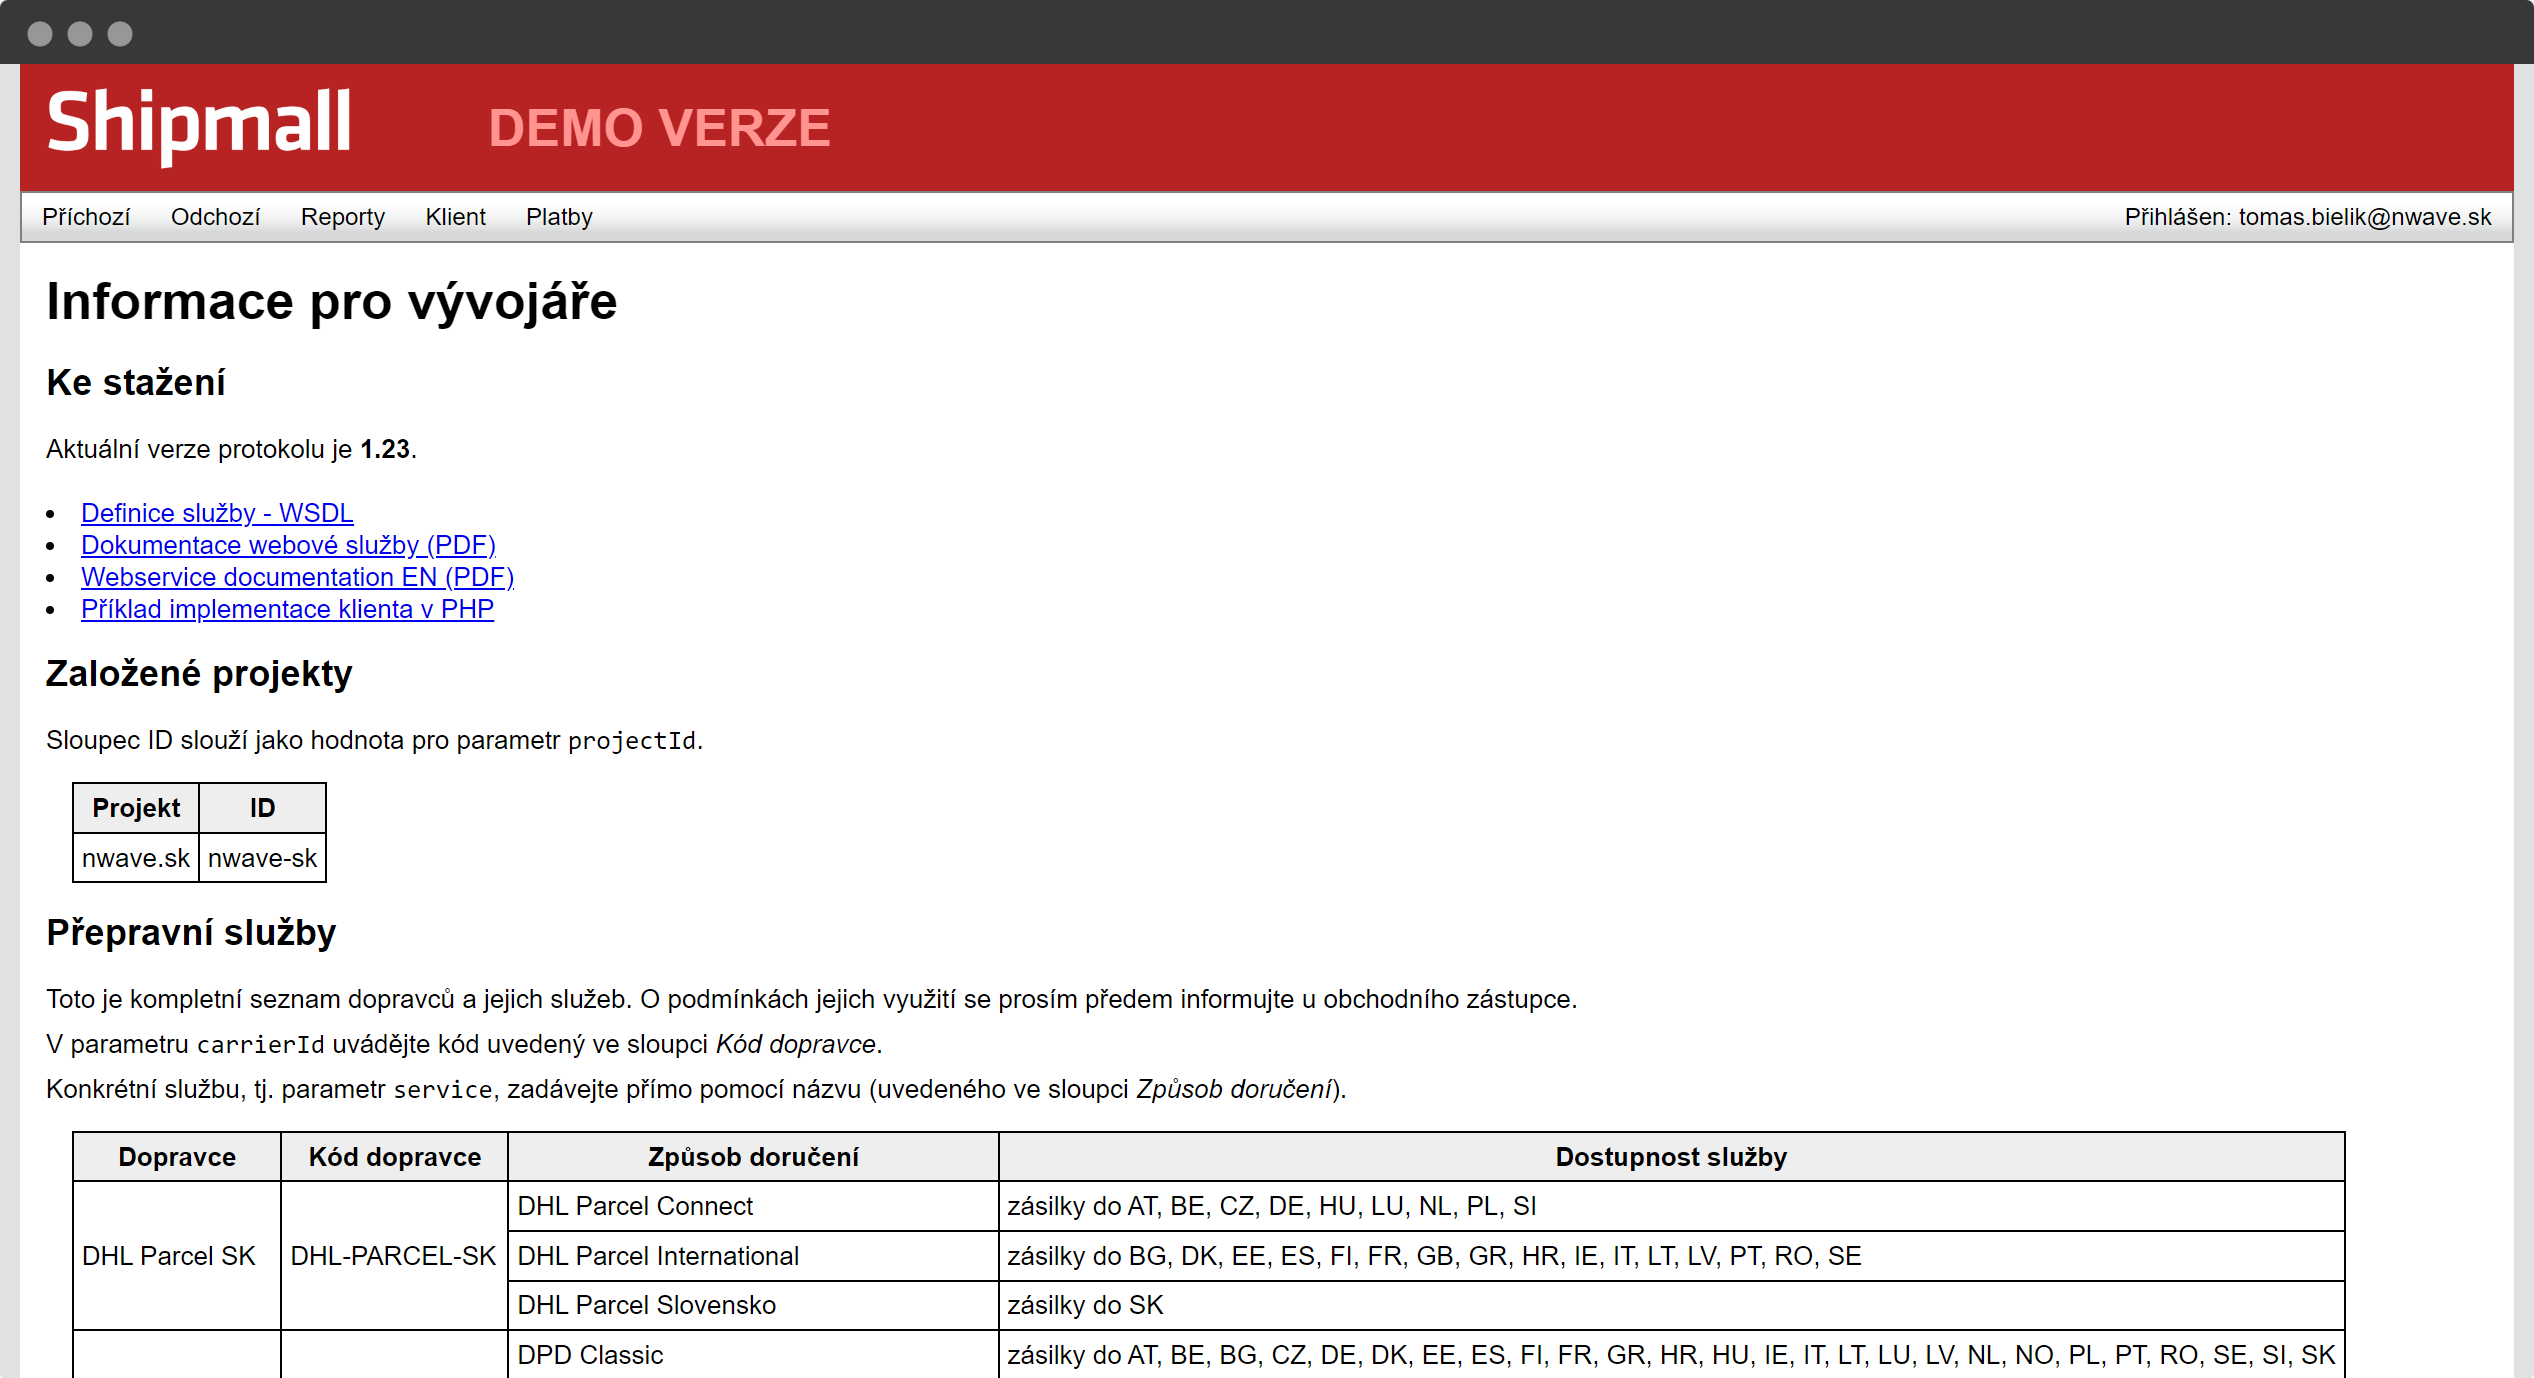
In the Shipmall Carrier ID parameter, enter the code listed in the Carrier Code column.
Enter the specific service, i.e. the Shipmall service parameter, directly by its name (listed in the Delivery method column).
Cash on delivery note
If you plan to use cash on delivery (COD) as a payment method, first familiarize yourself with the COD rules, which can also be found in the section Client – Information for developers.
The cash on delivery amount must be stated in the currency of the country where the shipment being delivered. The amount must respect the smallest coins used, i.e. it must be a multiple of them. The carrier must offer the COD service at all during transport to the given country.
Personal pickup locations
In addition to standard transportation methods, we also allow you to set up personal pick-up point services.
We currently only support the Packeta service.
The service is defined at the level of the contract with Shipmall, not at the level of the contract with a specific carrier.
To set up pairing with Packeta
Select shipping methods for which Packeta Pickup Point will be used. Customers will be forced to select Packeta Pickup Point instead of entering a shipping address to complete the order process on the checkout page.
Checkout
This section allows you to set up phone number validation, which is important for order synchronization with the Shipmall system. You can also enable hint display for this field and edit the hint text.
Triggers
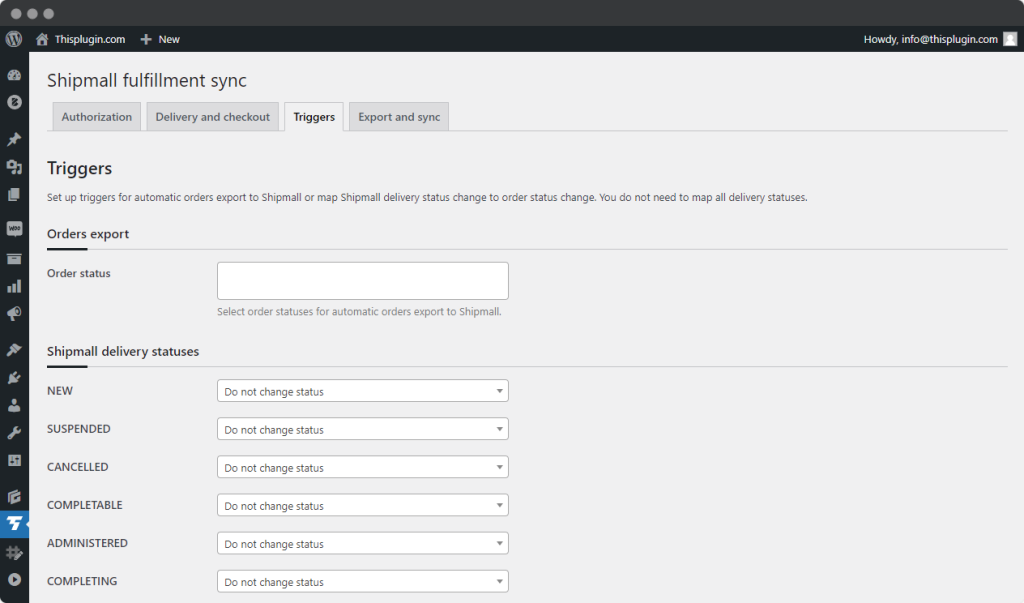
Triggers ensure that certain predefined actions are taken after a selected condition occurs.
Our triggers allow you to automatically export orders to Shipmall or map Shipmall delivery status changes to order status changes.
Orders export
Select order statuses for automatic order export to Shipmall. You can select any Woocommerce status. Most of our customers choose Processing status.
When the order reaches Processing status (or any other selected status) in any way (manually or automatically), it is automatically exported to Shipmall.
Shipmall delivery statuses
In this case, you map Shipmall delivery statuses to Woocommerce statuses. That is, when an order goes to one of your statuses in Shipmall, which status should it be synchronized with in Woocommerce.
You can map one state or multiple states. You don’t have to map every state, just the ones that are relevant to your business.
If the statuses provided by Woocommerce are not enough for you, you can create your own statuses and link them to transactional emails and Shipmall. Several plugins make this possible, such as our Advanced Emails plugin with the Order Status addon.
Export and sync
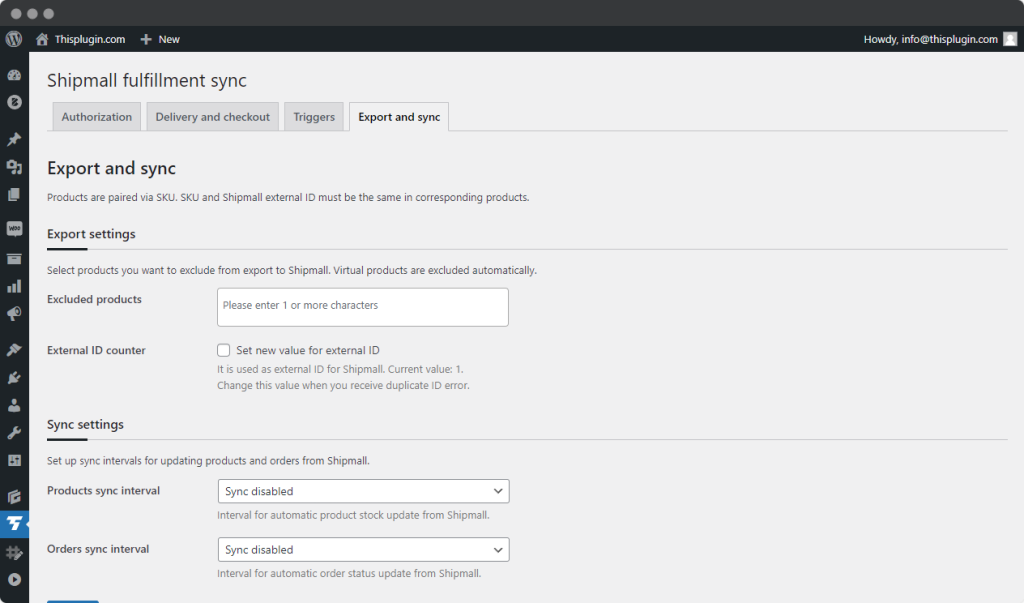
In this section you can set which products should be automatically exported to Shipmall after ordering and how often the stock and order status should be synchronized.
For product pairing, it is very important to know that products are paired by SKU. SKU and Shipmall external ID must be the same in the corresponding products.
Export settings
Select the products you want to exclude from export to Shipmall. In most cases, these are products that are not registered in the Shipmall fulfillment solution. Virtual products are automatically excluded.
For better compatibility and trouble-free sending of orders to Shipmall, we have added an External ID Counter. It is used to set the ID of the order sent to Shipmall. Set your own value if you get the error – duplicate order ID. It can happen for example after migration of online store.
Sync settings
In the Synchronization section, you can set how often you want to update product inventory information and order status information.
Products sync interval
Interval for automatic product inventory updates from Shipmall. You can turn off synchronization altogether (default) or set it from hourly to once a day.
Orders sync interval
Interval for automatic order status updates from Shipmall. You can turn off synchronization altogether (default) or set it from hourly to once a day.
Metabox on order and product details
Order metabox
For easier order management, we have added a metabox to the order details that allows you to cancel or disconnect the order from Shipmall.
Product metabox
Metabox on the product provides information about when the product inventory was last synchronized.
Uninstalling the plugin
You can find information about uninstalling the plugin in the Authorization section. After uninstalling the plugin, we will delete all the data that the plugin has created on the site.
The option to uninstall the plugin can be found in the ThisPlugin Manager. First disable the plugin and then uninstall it.
Need help?
Submit a ticket
Need help setting up the plugin? Submit a ticket in our support center and we will help you.
Feature request
Didn't find the feature you were looking for? Send us a request and we will consider adding it.
Changelog
The changelog lists all the new features, enhancements and fixes already released.
Roadmap
In the roadmap you will find a list of all planned or user-proposed features.